Welcome to the Eat Sleep Guitar Repeat Stand By Me guitar lesson. Here, I will be showing you how to play Stand By Me by Ben E. King on guitar in three different ways. We will look at how we can play the song with both open chords and with barre chords and also how we can play it with an open chords and capo combination.
Stand By Me is a nice and easy guitar song that’s open to guitarists of all skill levels. It uses just four simple chords and the same progression is used from start to finish, so we only need to learn a few simple bars and then repeat them through the entire song.
This song from 1961 has seen a lot of covers, including versions from Otis Reading and John Lennon. Today, it’s your turn. Let’s get started.
Stand By Me Guitar Lesson easy version beginner friendly (capo required)
The first approach to playing Stand By Me on guitar that we’re going to look at is the capo version. Naturally for this next section of the guitar lesson, you’ll need a capo and you’ll need to know how to use it correctly.
Before we look at the chord progression and how to perform it, let’s first learn what chord shapes we’re going to be using.
Stand By Me guitar chords version 1

As you can see, we have four simple open chord shapes that you should all know if you’re at the song learning stage.
I have used a less than standard version of the G major open chord here. I’ve done this simply because it’s the version I prefer and I find that it works better due to efficiently of movement. If you want to use the more traditional open G major chord shape, you can. It will have zero impact on the overall vibe of the song either way.
For this version of Stand By Me on guitar, the above chords will not be G, E minor, C, and D. The aforementioned capo and its placement changes what the chords are.
Capo at the second fret
As you can tell by the heading, we’re going to be placing our capo at the second fret. This means that our chords are no longer G, E minor, C and D. They’re now A, F sharp minor, D and E. The capo has shifted everything up by a full tone, but you perform the chords in the exact same way as you see in the charts and in the following TAB.
While reading the charts and TAB, think of it like this. The capo turns fret two into fret zero. Everything between the capo and the headstock no longer exists. Hope that makes sense.
Next, let’s look at the chord progression and how to perform it.
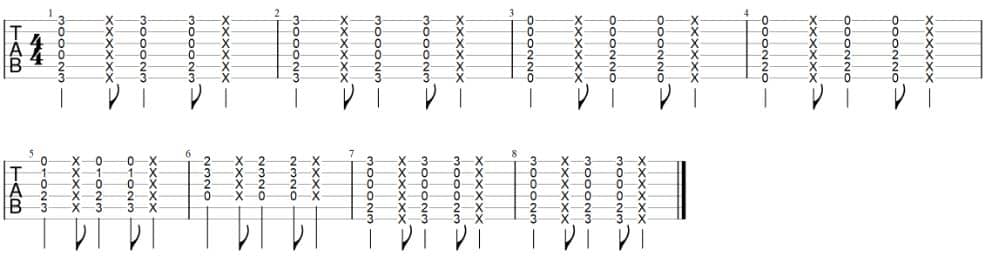
Stand By Me TAB version 1
The following eight bars are all you need. They’re repeated on loop through the entire song. The chord progression (thanks to the capo) is A / A / F#m / F#m / D / E / A / A. Remember, fret two is now fret zero.

There’s not much guidance required in terms of how the above is performed. There are clearly some percussive chops indicated by the Xs but aside from that, everything is fairly straightforward.
As for the strumming pattern, follow this. D DD UD. This includes the percussive chops which I assume you’re already familiar with. If not, you’ll clearly need to learn how to perform these before continuing. Apologies to those who aren’t familiar with this concept, but this is a song tutorial, not a technique tutorial. The percussive strums fall on the second downward strum and the final downward strum.
Beginners may find the specific placement of the rhythm a little tricky at first. Don’t over think it. Get that first percussive strum in line with the accented percussive part in the recording and just try to fall into the groove.
Stand By Me Guitar Lesson easy version beginner friendly (open chords no capo)
If you want to be true to the Ben E. King recording or, if you want to play along with the record, you’ll need that capo or, you’ll need to be in command of the barre chords used in version three which you’ll find toward the end of the lesson.
However, if you don’t mind playing Stand By Me in a lower key (this may actually be beneficial to some), you can simply remove the capo and play the same chords in the same exact way as before but in their original positions on the fretboard.
The chords haven’t changed so a chord chart isn’t required but I have adjusted the TAB for those who want it. I know you don’t really need it, but it took like five seconds. I just had to untick the capo box in Guitar Pro.
Stand By Me TAB version 2
Like I said, nothing has changed in terms of how the TAB is performed. We’ve just removed the capo from the second fret. This now gives us a chord progression of G / G / Em / Em / C / D.
Stand By Me Guitar Lesson barre chord version
The final part of this Stand By Me guitar lesson will show you how to play the song in the proper key without using a capo. We do this with barre chords. This is how I play Stand By Me but you may prefer one of the other approaches. Try them all and see which works best for you.
We will start by looking at the chord shapes that you’ll need. Naturally, you’ll need to be competent with basic barre chords for this part of the lesson but thanks to the simple rhythm and structure of Stand By Me, you can also use this as a musical way to practice barre chords.
Want more advice on barre chords? Go here.
Stand By Me guitar chords version 3

As you can see, we have three different shapes. We have both the five string and six string standard major barre chord as well as the standard six string minor barre chord shape.
Let’s see how these shapes appear in the TAB.
Stand By Me TAB Version 3

Now as you can see, nothing has changed in terms of the rhythm. The only difference is the chords themselves. When and how they’re performed has remained exactly the same and the percussive parts have remained the same also.
Stand By Me is a song that can be learned in just a few minutes but it’s a song that you’ll likely never forget. It’s one of those songs that’s incredibly enjoyable to play. Very calm and relaxing indeed, and it’s also a real crowd pleaser.
Some folk out there may be tempted to screw around with the rhythm and make things more complicated. Whilst there is definitely room for further development, I’d encourage you to keep this one simple. This isn’t a “look at what I can do on guitar” kind of song. Just learn it, play it, and enjoy it.
What next?
That concludes the Eat Sleep Guitar Repeat Stand By Me guitar lesson. Sometimes, you just can’t beat a nice easy and straightforward song. If you’d like to learn a few more simple and easy guitar songs that sound as good as this one does, check out the guitar lessons below which teach multiple songs in one lesson and also check out my list of easy guitar songs.

Hello. My name is Ryan J Mellor and I play the guitar. I’m also the creator of Eat Sleep Guitar Repeat. I’ve ben a guitarist for many years and my guitar playing has been described as “above average”. My guitar and music knowledge is somewhat impressive but most importantly, I have a passion for creating great guitar and music related content.